Labs (FAQ)
Table of contents
General
I have installed Android Studio. How can I run my applications to ensure that they work properly?
TA Response: There are two ways to run and debug your Android Applications:
- Android Emulator: You can run and deploy your Android applications on a virtual device. Please consult the comprehensive documentation and ensure that your desktop or laptop meets the minimum system requirements.
- Physical Device: You will need to enable USB Debugging in order for your phone to be recognized by Android Studio. Again, please refer to the documentation first and let us know if you run into any other problems.
I have followed the Emulator setup instructions. It still doesn’t work. Why?
TA Response: This has been a commonly reported problem. Please ensure that your desktop/laptop has virtualization enabled.
I’m really lost with Android Studio… Do you have a textbook reference for the course?
TA Response: Please speak with the teaching team as soon as possible. We are here to help you and wish to see you succeed. I highly recommend the textbook, Android Programming: The Big Nerd Ranch Guide (3rd). It has comprehensive case-studies and all of the demos are written in Java.
It has been quite some time since I wrote Java… Do you have any references that could be helpful?
TA Response: I found the textbook, Introduction to Java Programming and Data Structures, Comprehensive Version (11th) to be very helpful. Furthermore, this YouTube playlist by thenewboston is a great resource. I highly recommend it.
I can’t submit my lab as the zipped file size exceeds eClass limits! What should I do!?
TA Response: Firstly, prior to zipping the file, please ensure that you have cleaned the project. This will reduce the file size significantly as your cached files are deleted. If you have done so already and the error still persists, please reach out to the teaching team.
My code appears to be correct, however, Android Studio is still throwing errors! What should I do!?
TA Response: There are typically some problems that occur and persist when you add or delete resources. Synchronization problems can be traced to the R class, Manifest, or gradle changes. With that being said, you can generally solve most of these problems by:
- Build > Rebuild Project: Cached files are deleted and the project is rebuilt from scratch. This often solves many problems.
- Sync Project with Gradle Files: Click the elephant icon located in the top right corner. Problems occur here when you change build.gradle as everything goes out-of-sync.
- File > Invalidate Caches…: Make sure to select all of the optional parameters and restart the IDE. Caches and indexes are deleted and the project is rebuilt reducing the likelihood of propagated errors.
- If all else fails, then you need to use Android Lint, the debugger (e.g., breakpoints), and ensure that your XML files (e.g., layouts) are correct.
How do I install a SDK?
TA Response: You can download a SDK by navigating to File > Settings > Languages & Frameworks > Android SDK and following the installation steps.
Lab Questions & Hints
Lab 1 (Demo_Android)
I keep getting errors when importing Demo_Android! The app won’t event run….
TA Response: Firstly, please make sure that you have downloaded the lab from here. The older source is known to have problems with newer versions of Android Studio.
If the bugs persist, please do the following and let me know if you are still facing difficulties:
- Upgrade Gradle to the recommended version
- Upgrade the dependencies as suggested by the Android SDK Update Assistant
- Sync Project with Gradle Files
- Rebuild the Project
I see that Task 5 asks for source-code comments. To what extent should I be documenting my code?
TA Response: You should use in-line comments for any small modifications that you make to the existing Java code (e.g., New Variables, Connecting an Event Listener). If you are adding new methods (e.g., implementing an interface and overriding method(s)), then you should use Javadoc.
Any modifications that you make to the layout or resources (e.g., String) should be documented using in-line style. XML uses the same commenting style as HTML. See below:
<!-- This is how we add comments in XML :) -->It would also be appreciated if you include a brief summary of what you implemented and how you did it in the header block comment which includes your name, student id, etc.,
Should I submit my Lab once it is checked off or is it okay to submit it prematurely?
TA Response: If the application passes the demo and you have sufficiently documented your code, feel free to submit it before talking to me! However, some students in the past have had to make changes to their work in the lab sessions and forgot to re-submit the zip file. In such cases, you will lose marks for this. I recommend submitting your work once we have gone through it together to avoid this.
I’m completely lost. I’ve spent hours trying to do this lab and nothing is working…
TA Response: Please reach out to the teaching team over Slack ASAP. You should post your questions in the general chat section so that everyone benefits! I’m sure other people are feeling the same way as you and have similar questions. Please let us know what you have tried first.
Lastly, you can refer to Demo_Elections.zip. Look at what I’ve done and use the documentation to understand how the code and xml work together.
Lab 2 (Demo_Buttons)
I imported Demo_Buttons into Android Studio. Everything worked fine until I refactored the package and class names. I keep getting java.lang.ClassNotFoundException! Please help, what should I do!?
TA Response: Please go to AndroidManifest.xml and ensure that android:name is properly defined in your activity tag. It should be, “.DemoButtons99999Activity”.
My Views are being cropped when the Activity changes orientation. What should I do? Help!
TA Response: You will either need to re-arrange the views in your defined horizontal layout (layout-land) or use a ScrollView as the top-most parent.
What exactly do I need to save and restore?
TA Response: Run the application and investigate what happens when you tap the widgets and change the screen orientation. You will find that certain View properties are natively managed by the Android OS. Don’t save and restore states that are already supported.
I’m confused by Task 4 part 1. Can you please give me some clarification?
TA Response: The window background colour of the activity should be changed to #ff123456 without modifying the layout width or height of the LinearLayout.
To do this, please read the documentation on applying styles to your Android application.
See the example screenshot for reference. I made the background colour green.
Can you please elaborate on how complex my original feature should be?
TA Response: Well.. You can’t go wrong with adding a new image button… I tend to like creative and unique features!
Please don’t just change a property in the layout (XML) that does not add any substantial contributions to UI/UX.
I’ve spent hours trying to finish this lab… I’m at a complete loss of how to proceed. What should I do?
TA Response: Please take a read through the Demo_Layout and Demo_Buttons documentation. You can also benefit from reading about the activity lifecycle. Pay special attention to the following methods:
 protected void onSaveInstanceState(@NonNull Bundle outState)
 protected void onRestoreInstanceState(@NonNull Bundle savedInstanceState)
Lab 3 (Demo_Scale)
How can I replace the image of Vari Hall at run-time? I am so confused!!
TA Response: You need to use an Intent. Make sure that you set the type and action appropriately for the task.
Furthermore, you will need to override:
protected void onActivityResult(int requestCode, int resultCode, Intent data)to interface with startActivityForResult().
Note: Loading the image at run-time requires you to convert the Uri from data into a Drawable. You may reference Demo_Drawables as an example.
How can I ensure that scaling only occurs when I tap the image?
TA Response: You should carefully consult the Demo_Scale Documentation.
“This is a simple matter of creating a rectangle holding the current coordinates of the image and passing the rectangle to the contains method of the RectF class, along with the x-y coordinate of the touch point. The return value is true if the touch point is inside the image.”
Most of the code has already been provided for you. Simply copy-paste, make modifications, and add sufficient documentation!
I’m confused about Task 4 (Part 2). Can you expand on scaling the zoom-in at the location of the double-tap?
TA Response: Once you double-tap the image, it should be scaled (zoomed-in) and repositioned to maintain the focal point. A focal point is the region that you tapped (or more appropriately, the part of the image for which you are interested in viewing.)
For example, if I tap the top-right corner, the image needs to be scaled and shifted to the left, maintaining the focal point. I may end up posting a YouTube recording demonstrating the expected behaviour if there is still confusion.
What kinds of original features should we try to implement?
TA Response: Be creative! Again, the feature should be justfiable; simply changing a property in the widget that adds no UI improvements is not a good idea… One example idea is to change the background colour of PaintPanel to black when you Zoom-in so that the image pops out more.
Lab 4 (Demo_TiltBall)
Do I need an Android device for this lab? I only have an iPhone!
TA Response: Technically, no, however, your life will be far more difficult by not using a physical device….
Back when I was an Undergraduate student in first year (2017), you could rent out Android Tablets at William Small Center (WSC). I would speak to the Lab Technician and see if you can still borrow a physical device as the website indicates this to still be the case.
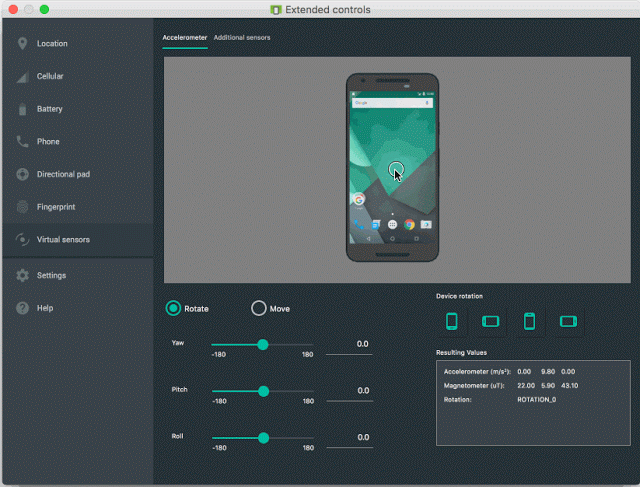
In the worst-case scenario, you can emulate pitch, roll, tilt, and position movements on the virtual device.
 1. Start the Virtual Device
 2. Navigate to, "Running Devices" and hover over the ">" icon.
 3. While hovering, click the "⋮" icon
 4. Click, "Virtual sensors" and click, "Device Pose"
 5. Profit 8)
If you have followed the above instructions correctly, you should see the following window appear:
How do I add a lap line? What about an indicator (arrow)?
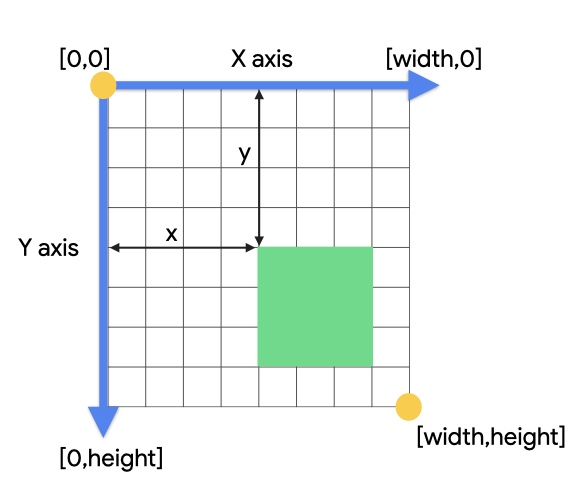
TA Response: You should take a close look at
protected void onDraw(Canvas canvas)which resides within RollingBallPanel.java.Some students may get confused by how the drawing coordinate system works. Please see the diagram below, which has been referenced here.
When counting laps, how can I ensure that the ball moves in a particular direction?
TA Response: The application already collects the necessary data for you to determine whether the ball is moving across your starting line in the correct direction. Recall the principles of pitch, roll, and tilt.

How do I play an audio signal when the ball crosses the starting line?
TA Response: Please take a look at the ToneGenerator API.
How advanced should my anti-cheat be?
TA Response: Per the instructions, “As a minimum check on cheating, ensure that the path of the ball for each lap extends at least to the opposite side of an imaginary vertical line down the center of the display.” You can be as creative as you want, so long as it works :P
I’m having a really hard time figuring out how to keep track of my in-path time…. Can you give me some hints?
TA Response: I generally recommend using the StopWatch class from the Apache Commons Lang Library.
You will need to add the dependency in your build.gradle (Module:app).
 dependencies {
     implementation 'androidx.appcompat:appcompat:1.7.0'
     implementation 'com.google.android.material:material:1.12.0'
     implementation 'androidx.activity:activity:1.10.0'
     implementation 'androidx.constraintlayout:constraintlayout:2.2.0'
     implementation 'org.apache.commons:commons-lang3:3.6'
 }
You can also keep a running sum of in-path time using basic calculations with System.currentTimeMillis().
How can I modify my application so that a wall hit is only registered when the ball touches a border line moving from a position inside the path?
TA Response: Carefully read the Demo_Tiltball API. The idea is to leverage another boolean flag similar to
touchFlag.I’m having trouble creating a new activity for my results screen! When I click New > Activity, all of the options are unavailable!?
TA Response: You can technically copy an existing Activity and modify it to work, however, I recommend taking the following steps:
     1. In Gradle Scripts > gradle.properties (Project Properties),
     add, "android.useAndroidX=true"

     2. In Gradle Scripts > build.gradle (Module :app),
     change the following Sdk versions to:

     --------------------
     compileSdk 35
     minSdkVersion 21
     targetSdk 33
     --------------------

     3. Sync Project with Gradle Files
     4. Create a new app by navigating to: app > New > Activity > Empty Views Activity

     5. In AndroidManifest.xml, set the Results Activitys' theme to one
     that inherits from AppCompat.

     For example, "@style/Theme.AppCompat.Light.DarkActionBar"

     6. Sync Project with Gradle Files.
     7. Run the application on your device.
What kind of original feature should I implement?
TA Response: You should try to be creative with this lab given that it’s a game. One example would be to change the colour of the path when the ball escapes from the track.
How do I start an activity from within RollingBallPanel.java?
TA Response: You need to define an Intent. Following this, you can leverage startActivity(….) with the correct parent and class.
How do I implement support for the exit button?
TA Response: In the method which supports your exit buttons onClick, you should make a call to
finishAffinity().Per the documentation,
finishAffinity()will, “Finish this activity as well as all activities immediately below it in the current task that have the same affinity. […] In this case, if the user has navigated down into any other activities of the second application, all of those should be removed from the original task as part of the task switch.”
Lab 5 (Demo_Camera)
How do I add image assets to Android Studio for my ImageButtons?
TA Response: The easiest method is to leverage Android Studio’s built-in vector assets.
Under res, right-click the drawable directory and select New > Vector Asset. Change the properties as needed and click, “next” followed by, “finish”.

You can read the documentation to learn how to bind the vector asset to your ImageButton.
I have changed the Buttons to ImageButtons in DemoCameraActivity.java. When I run the application, it is crashing without errors!!!! How do I fix this?
TA Response: Please ensure that you have removed the Button casts inside of
public void initialize().I’m really struggling with adding GridView support to the lab. Can you give me some hints and/or suggestions?
TA Response: Practically speaking, you should be leveraging assets from Demo_GridView. To understand which files you need to copy over and how to make the corresponding changes to the lab, please carefully read the relevant documentation.
Note: You must cite any files that are re-used or it is considered plagiarism.
How do I share the loaded image through e-mail or other social media(s)?
TA Response: You will need to use an Intent. Most of the work can be re-used from referencing Demo_Ink or Demo_Drawables.
Hint: If you have done everything properly, you may notice a very annoying runtime error (
android.os.FileUriExposedException) when the Intent is started.Please carefully read the following references to address the problem. Consider each suggestions strengths and weaknesses in terms of scalability and maintainability.
How can I implement support for the options bar in ImageViewerActivity.java?
TA Response: Carefully read Android’s Menu Documentation. Of particular importance are the following methods that you will need to override:
 public boolean onCreateOptionsMenu(Menu menu)
 public boolean onOptionsItemSelected(@NonNull MenuItem item)
Closing Remarks
Rest here, weary travelers.
By now, you’ve seen too many Android Studio errors. 
In all seriousness, if you’ve made it this far, I assume that you have completed all of the course assessments barring the final exam.
Congratulations 🥳!!!!
It has been a pleasure having had the opportunity to work with you over the last 4 months.
I wish you all the best in your future endeavours 😆!
Cheers,
S. Toyonaga